To be able to interact with already paired HomeKit accessories through third-party software, such as the Home Assistant HomeKit Device Integration, without needing to reset the accessory, it is necessary to possess the public and private keys of your HomeKit pairing identity, as well as the public key of your HomeKit accessories. These keys are used by your Apple device to establish a secure communication channel with the accessories. They are synchronized via iCloud and can be extracted from a device running macOS.
One specific use-case for this is if you are trying to have Home Assistant interface with Apple HomePods to read their temperature and humidity sensor values, as they can not be paired using the officially supported approach. This is the goal we are going to focus on.
This guide uses a fork of the KeychainKit project to extract the keys from the macOS Keychain, to which I have applied some minor tweaks for it work on Apple Silicon machines running a recent version of macOS. This fork and the following instructions have been tested on an Apple Silicon machine running macOS Sonoma 14.0. It is possible that future versions of macOS will prevent this from working.
Extract HomeKit Pairing Identity and Paired Accessory Keys
In order to be able to read the HomeKit keys from the Keychain, it is necessary to sign KeychainKit with special entitlements granting it access to the com.apple.hap.pairing Keychain access group. This access group is protected by macOS and not normally readable in an effort to protect the confidentiality of your sensitive HomeKit credentials. For this to work, both your Mac’s System Integrity Protection and Apple Mobile File Integrity need to be temporarily disabled during the key extraction procedure.
Disable System Protections
To disable your Mac’s System Integrity Protection (SIP), it is necessary to first boot your Mac into recoveryOS. This is done by first shutting it down, holding the power button until “Loading Startup Options…” appears and choosing the “Startup Options” entry.
Once within recoveryOS, it will ask you to log into an existing macOS account. Afterwards, launch the Terminal via the “Utilities” menu bar section and disable the System Integrity Protection:
# Run from within recoveryOS
$ csrutil disable
# Reboot
If you have multiple instances of macOS installed, it will prompt you for which one to set the SIP status. Choose the instance you will be extracting your HomeKit keys from.
After disabling SIP, you need to reboot your Mac to return to macOS, as the following step does not work when ran from recoveryOS on recent macOS versions.
Once back within macOS, open your Terminal and disable Apple Mobile File Integrity (AMFI) by running the following:
# Run from within macOS
$ sudo nvram boot-args="amfi_get_out_of_my_way=0x1"
# Reboot
You can verify if the boot arguments were successfully set by running:
$ sudo nvram boot-args
boot-args     amfi_get_out_of_my_way=0x1
After this, reboot your Mac once more for the change to kick in.
Extract your Keys
To extract the keys, we are going to use my fork of the KeychainKit project. In order to be able to compile, sign and run the included KeychainTool, ensure that the latest version of Xcode is installed and your active developer directory is switched to your current Xcode installation.
$ xcode-select --switch /Applications/Xcode.app/Contents/Developer
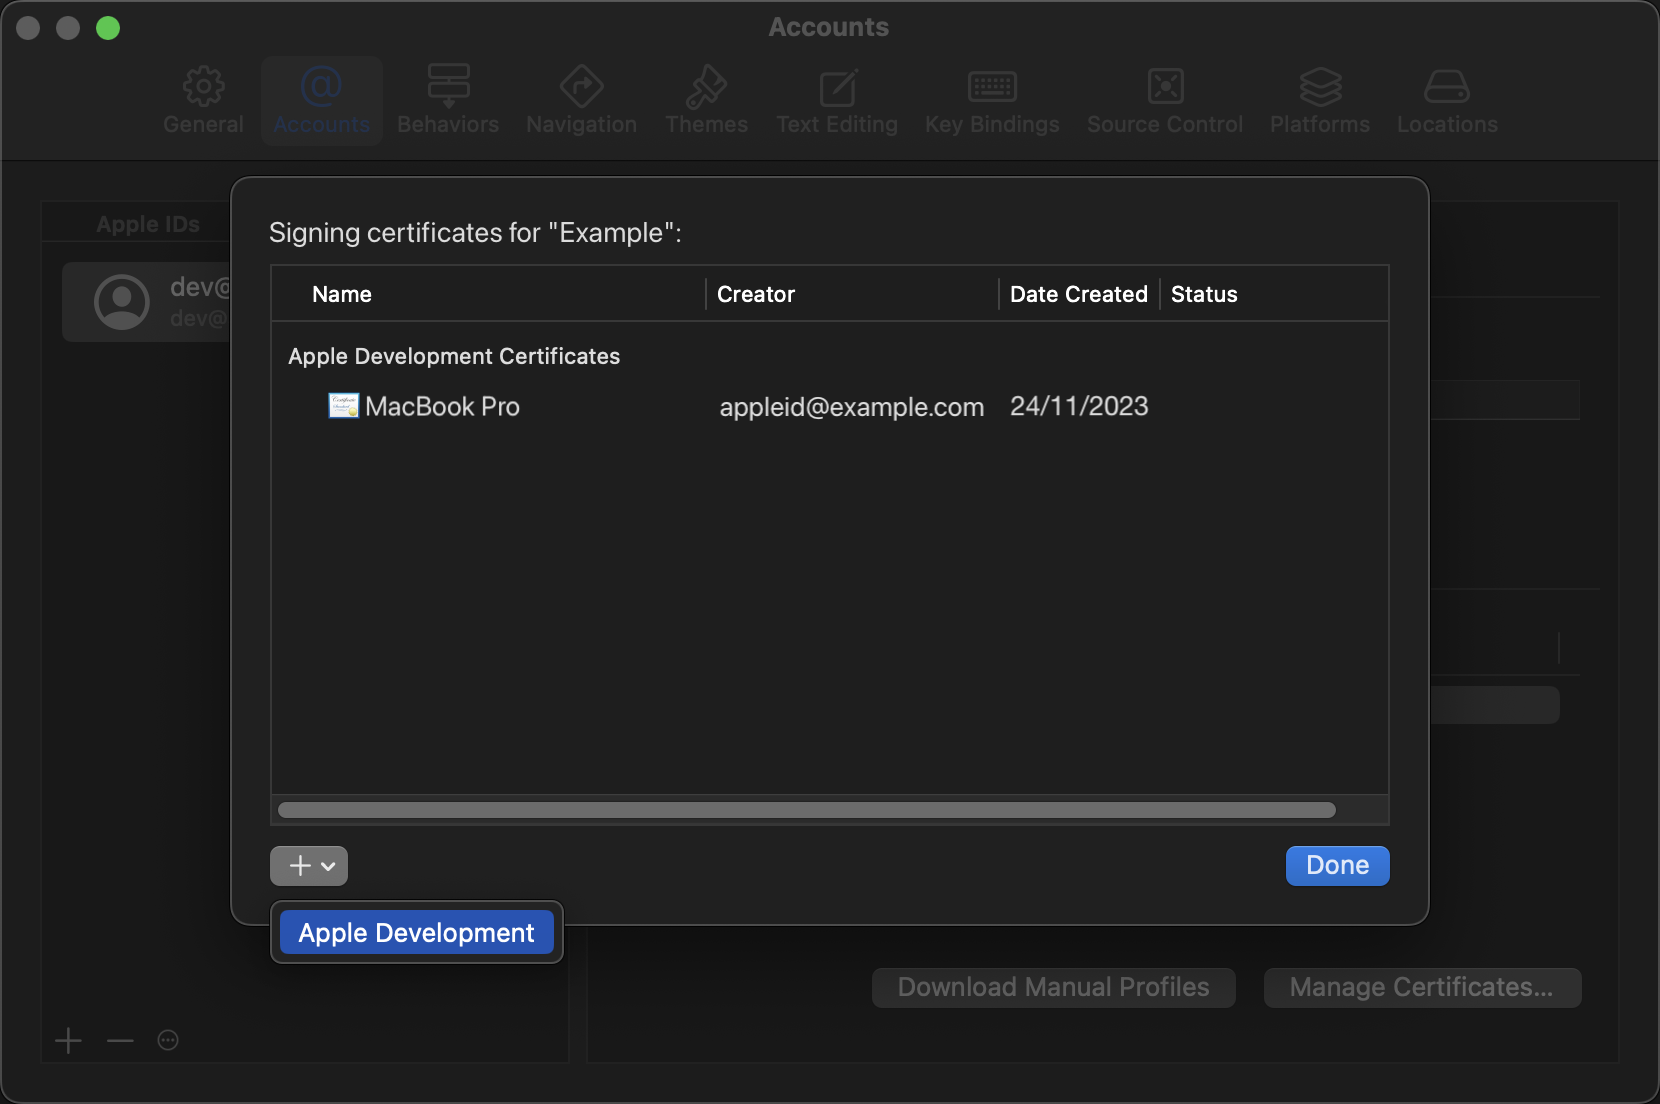
Once Xcode is installed and set up correctly, make sure to fetch your code-signing certificate via the Xcode account settings if it is not already present. This can be done under Xcode -> Settings... -> Accounts -> Manage Certificates -> (+) -> Apple Development, as shown below.
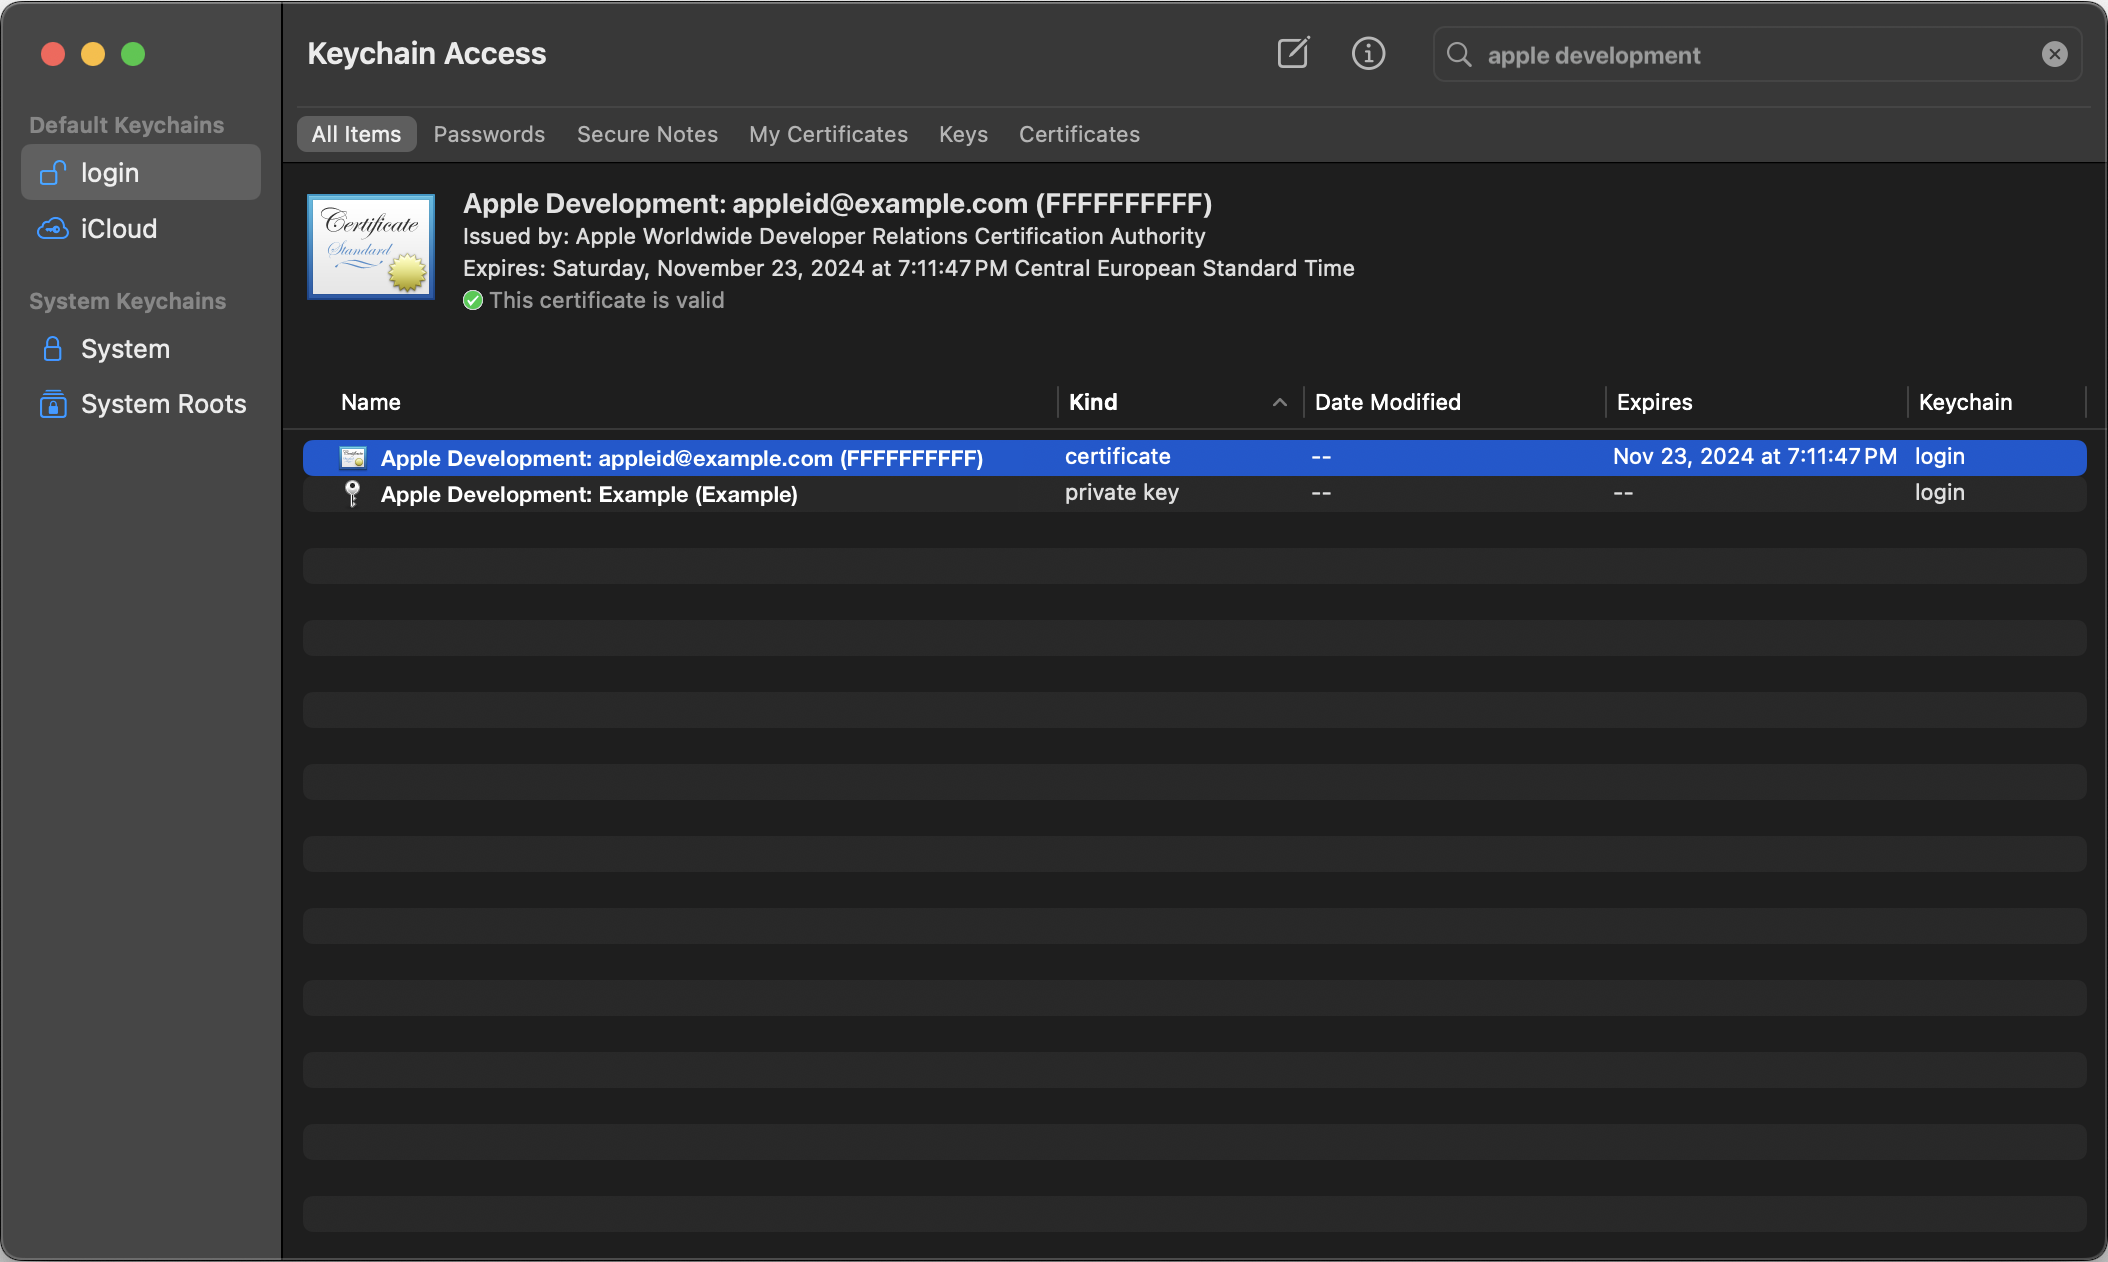
Once your certificate has been fetched, find your code-signing identity via Keychain Access. It will be named something along the lines of “Apple Development: appleid@example.com (FFFFFFFFFF)”. Check its validity status once found.
If your certificate is shown as being invalid or not trusted, you will need to install the following two missing intermediate CA certificates:
- Apple Worldwide Developer Relations Certificate Authority: https://developer.apple.com/certificationauthority/AppleWWDRCA.cer
- Apple Worldwide Developer Relations Certificate Authority G3: https://www.apple.com/certificateauthority/AppleWWDRCAG3.cer
Set the environment variable CODESIGNKIT_DEFAULT_IDENTITY to the name of your code-signing identity and run KeychainTool to dump your keys:
$ git clone https://github.com/pseudorandomuser/KeychainKit.git
$ cd KeychainKit
$ mkdir dump
$ export CODESIGNKIT_DEFAULT_IDENTITY=\
"Apple Development: appleid@example.com (FFFFFFFFFF)"
$ swift run KeychainTool -g "com.apple.hap.pairing" 1> dump/dump.txt 2>&1
The output of KeychainTool will be dumped into dump/dump.txt. Check if the file indeed contains any keys and proceed to the following sections only if the dump was successful and contains your keys, otherwise troubleshoot and try again.
Restore System Protections
As your keys are now dumped and access to the com.apple.hap.pairing Keychain access group is no longer needed, it is now time to restore the system protections that were disabled earlier, as your Mac is currently running in an insecure state. To do this, first re-enable Apple Mobile File Integrity (AMFI) while still within macOS.
$ sudo nvram boot-args=""
Reboot into recoveryOS as outlined in the first step of the ‘Disable System Protections’ section. Again, from within recoveryOS, open your Terminal, re-enable System Integrity Protection (SIP) and reboot your Mac back into macOS.
- Note: It is required to connect to a network with a working Internet connection prior to re-enabling full system security.
$ csrutil enable
Discover HomeKit Devices on the Network
In order to figure out which devices the dumped keys belong to, we will be using the HomeKit Python library. It will be used later to test the correctness of the extracted keys, but for now, we will focus on device discovery only. Install HomeKit Python using pip and run device discovery on your network:
$ python3 -m pip install "homekit[IP]" --user
$ python3 -m homekit.discover
From the discovery output, take note of the Device ID values and find the correlation between the Device ID in the discovery output and the Paired HomeKit Accessory Account values in dump/dump.txt. This way, you will know which keys in the dump belong to which accessory.
For convenience, label the Paired HomeKit Accessory blocks in dump/dump.txt by name and IP address to facilitate the following steps.
Extract your HomeKit Pairing Identity Keys
Extract the relevant information about your HomeKit Pairing Identity from dump/dump.txt. If there is more than one HomeKit Pairing Identity, determine which one is in use with your accessories.
- It is most likely going to be the one with the most recent creation date prior to the creation date of the accessory in question.
- If this is not the case, you will need to go about this in a trial-and-error manner and try to establish a connection with all of the identities until one of them allows you to connect.
- Note: Different accessories may be associated with different HomeKit Pairing Identities.
[*] HomeKit Pairing Identity (com.apple.hap.pairing)
[ ] Class: Generic Password
[ ] Label: HomeKit Pairing Identity
[ ] Creation Date: XXXX-XX-XX XX:XX:XX AM +0000
[ ] Modification Date: XXXX-XX-XX XX:XX:XX AM +0000
[ ] Synchronizable: true
[ ] Access Group: com.apple.hap.pairing
[ ] Service: HomeKit Pairing Identity
[ ] Account: <iOSPairingId>
[ ] Key: “<iOSDeviceLTPK>+<iOSDeviceLTSK>”
Note down the following values:
iOSPairingId: Your HomeKit Pairing Identity IDiOSDeviceLTPK: Your device’s Long-Term Public KeyiOSDeviceLTSK: Your device’s Long-Term Secret/Private Key
The public and secret keys are combined within the Key field and separated by a + sign.
Extract your HomeKit Accessory Public Keys
For each of the discovered accessories you intend to use, extract the relevant information from dump/dump.txt. Accessory entries will look similar to this:
[*] Paired HomeKit Accessory: XX:XX:XX:XX:XX:XX (com.apple.hap.pairing)
[ ] Class: Generic Password
[ ] Label: Paired HomeKit Accessory: XX:XX:XX:XX:XX:XX
[ ] Creation Date: XXXX-XX-XX XX:XX:XX AM +0000
[ ] Modification Date: XXXX-XX-XX XX:XX:XX AM +0000
[ ] Synchronizable: false
[ ] Access Group: com.apple.hap.pairing
[ ] Service: Paired HomeKit Accessory: XX:XX:XX:XX:XX:XX
[ ] Account: <AccessoryPairingID>
[ ] Key: “<AccessoryLTPK>”
Note down the following values for each accessory:
AccessoryPairingID: The accessory’s Pairing IDAccessoryLTPK: The accessory’s Long-Term Public Key
Using HomeKit Python
We will be using the HomeKit Python library we installed earlier to discover the accessories on the network to interact with the accessories and test the correctness of the keys we just obtained. If you skipped the device discovery part earlier, please install HomeKit Python now:
$ python3 -m pip install "homekit[IP]" --user
Populate the Pairing Configuration for HomeKit Python
Create and populate dump/pairing.json with the previously gathered information. Replace all placeholders wrapped in angle brackets with their respective values. One entry is required per accessory. Use the configuration format outlined below:
{
    "<DeviceName>": {
        "AccessoryPairingID": "<AccessoryPairingID>",
        "AccessoryLTPK": "<AccessoryLTPK>",
        "iOSPairingId": "<iOSPairingId>",
        "iOSDeviceLTSK": "<iOSDeviceLTSK>",
        "iOSDeviceLTPK": "<iOSDeviceLTPK>",
        "AccessoryIP": "<IPv4Address>",
        "AccessoryPort": 55523,
        "Connection": "IP"
    },
}
This example is specific to Apple HomePods using an AccessoryPort value of 55523. Your device may use a different AccessoryPort such as 8080, which would be indicated during device discovery. Make sure to use the appropriate port for your device and allow traffic to it through your firewall.
Use HomeKit Python to Test the Connection to the Accessories
For each configured accessory, run the following command to verify the correctness of your configuration. Replace <DeviceName> with the device name you defined in dump/pairing.json.
$ python3 -m homekit.get_accessories -f dump/pairing.json -a <DeviceName>
If successful, this command will output all services exposed by the accessory. If the connection fails, this likely means that you are using the wrong HomeKit Pairing Identity with your accessory. In this case, you need to do the following:
- Repeat the instructions in the ‘Extract your HomeKit Pairing Identity Keys’ section.
- Repeat the instructions in the ‘Populate the Pairing Configuration for HomeKit Python’ section and populate your
dump/pairing.jsonfile with the newiOSPairingId,iOSDeviceLTPKandiOSDeviceLTSKvalues, then try establishing a connection with the command above once more. - Repeat as long as necessary until a connection can be established.
Congratulations! You can now use the keys you extracted from your Keychain to interact with your HomeKit accessories.
Configure the Home Assistant Integration for HomeKit Devices
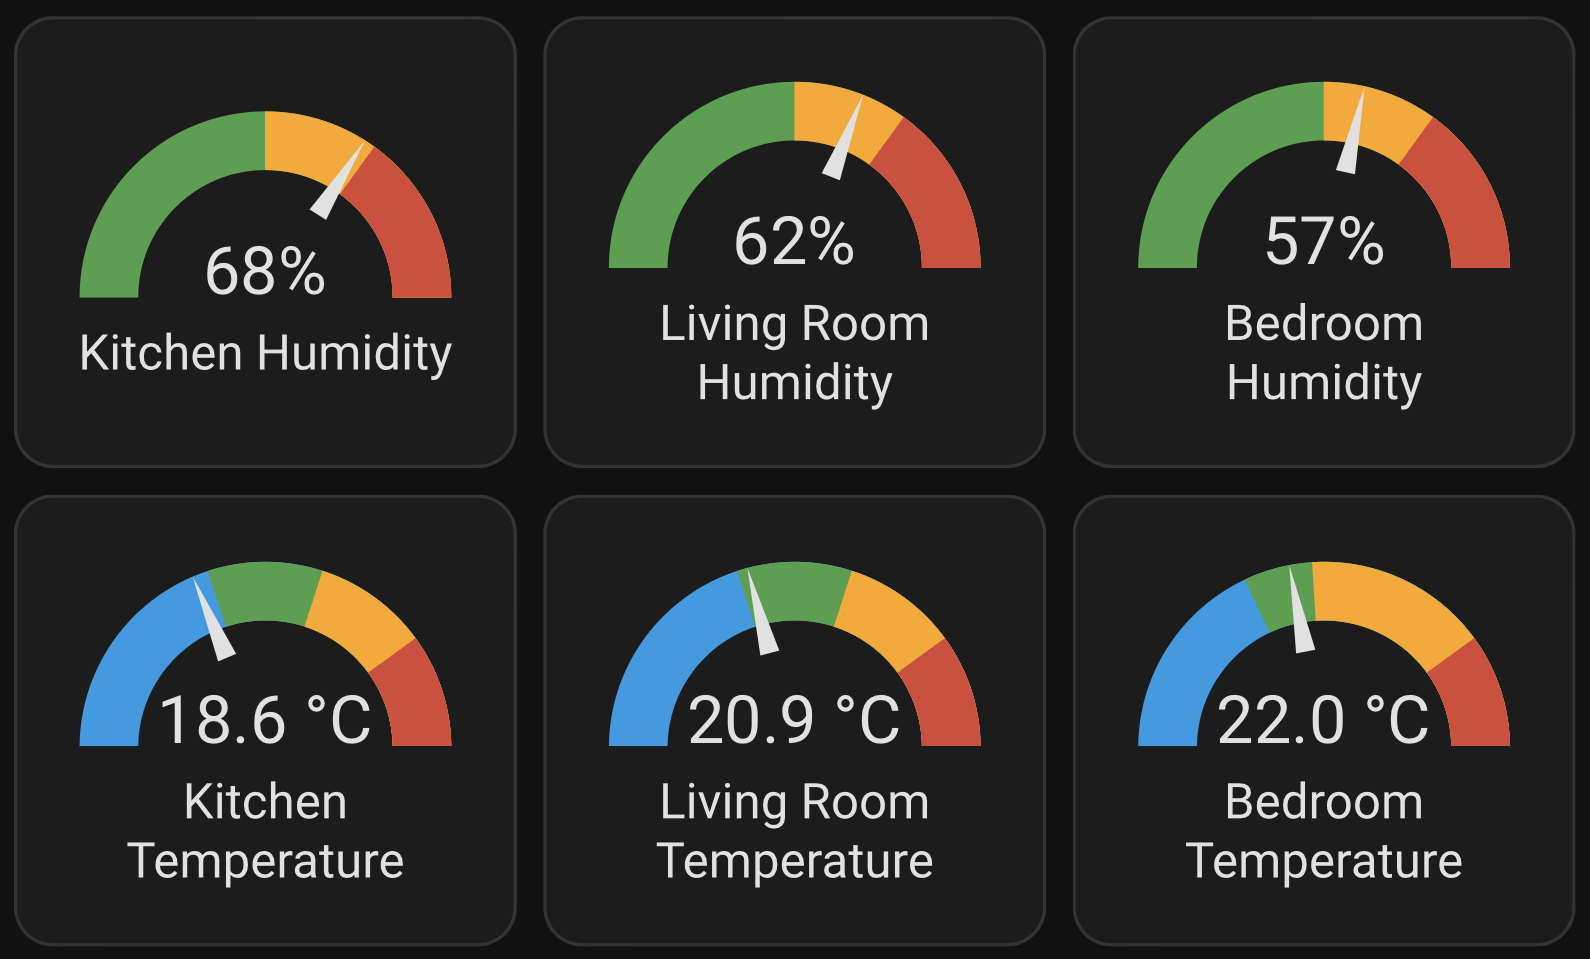
My main objective for doing this was to be able to integrate the temperature and humidity sensors in Apple HomePods into my Home Assistant ecosystem. As I already had the HomePods and they already come with the necessary hardware, I preferred to tinker around with this over having to purchase additional hardware to do the job.
When following this guide for use with Home Assistant, please note that it is easily possible to break your Home Assistant instance by installing an invalid configuration file into your Home Assistant configuration’s .storage directory, as these configuration files are normally not intended to be edited manually but are rather managed by Home Assistant. Therefore, please make absolutely sure to backup your instance before proceeding, or at the very least to keep a copy of any unmodified files you extract from your .storage directory.
First, you will need to stop your running Home Assistant instance and extract .storage/core.config_entries from your Home Assistant configuration directory. For convenience, copy it to dump/core.config_entries.
For each device, add an entry to dump/core.config_entries following the data structure below. Replace all placeholders wrapped in angle brackets with their respective values. Before proceeding, please note the following:
- The
datafield is identical to the accessory’s HomeKit Python pairing configuration, as Home Assistant uses this same library to interface with HomeKit devices. You can port it to the Home Assistant configuration directly. <AccessoryPairingID | lower>represents the lower-case equivalent of the<AccessoryPairingID>value.- For convenience, you can generate random 128-bit hex strings for use as
entry_idby runningopenssl rand -hex 16.
{
    "entry_id": "<Random128BitHexString>",
    "version": 1,
    "domain": "homekit_controller",
    "title": "<DeviceName>",
    "data": {
        "AccessoryPairingID": "<AccessoryPairingID>",
        "AccessoryLTPK": "<AccessoryLTPK>",
        "iOSPairingId": "<iOSPairingId>",
        "iOSDeviceLTSK": "<iOSDeviceLTSK>",
        "iOSDeviceLTPK": "<iOSDeviceLTPK>",
        "AccessoryIP": "<IPv4Address>",
        "AccessoryPort": 55523,
        "Connection": "IP"
    },
    "options": {},
    "pref_disable_new_entities": false,
    "pref_disable_polling": false,
    "source": "zeroconf",
    "unique_id": "<AccessoryPairingID | lower>",
    "disabled_by": null
}
At this point, make sure you have backed up your instance, or at least have a copy of the unmodified file you extracted from .storage/core.config_entries. Validate your modified dump/core.config_entries file using a JSON validator.
You may want to refrain from using online JSON validators, as this file contains a multitude of sensitive values such as the keys you just extracted. One simple way to validate the modified file locally is to run the following command:
$ python3 -m json.tool dump/core.config_entries
Only if the JSON validation was successful, overwrite the .storage/core.config_entries file in your Home Assistant instance’s configuration directory with the contents of your modified dump/core.config_entries file and start your Home Assistant instance.
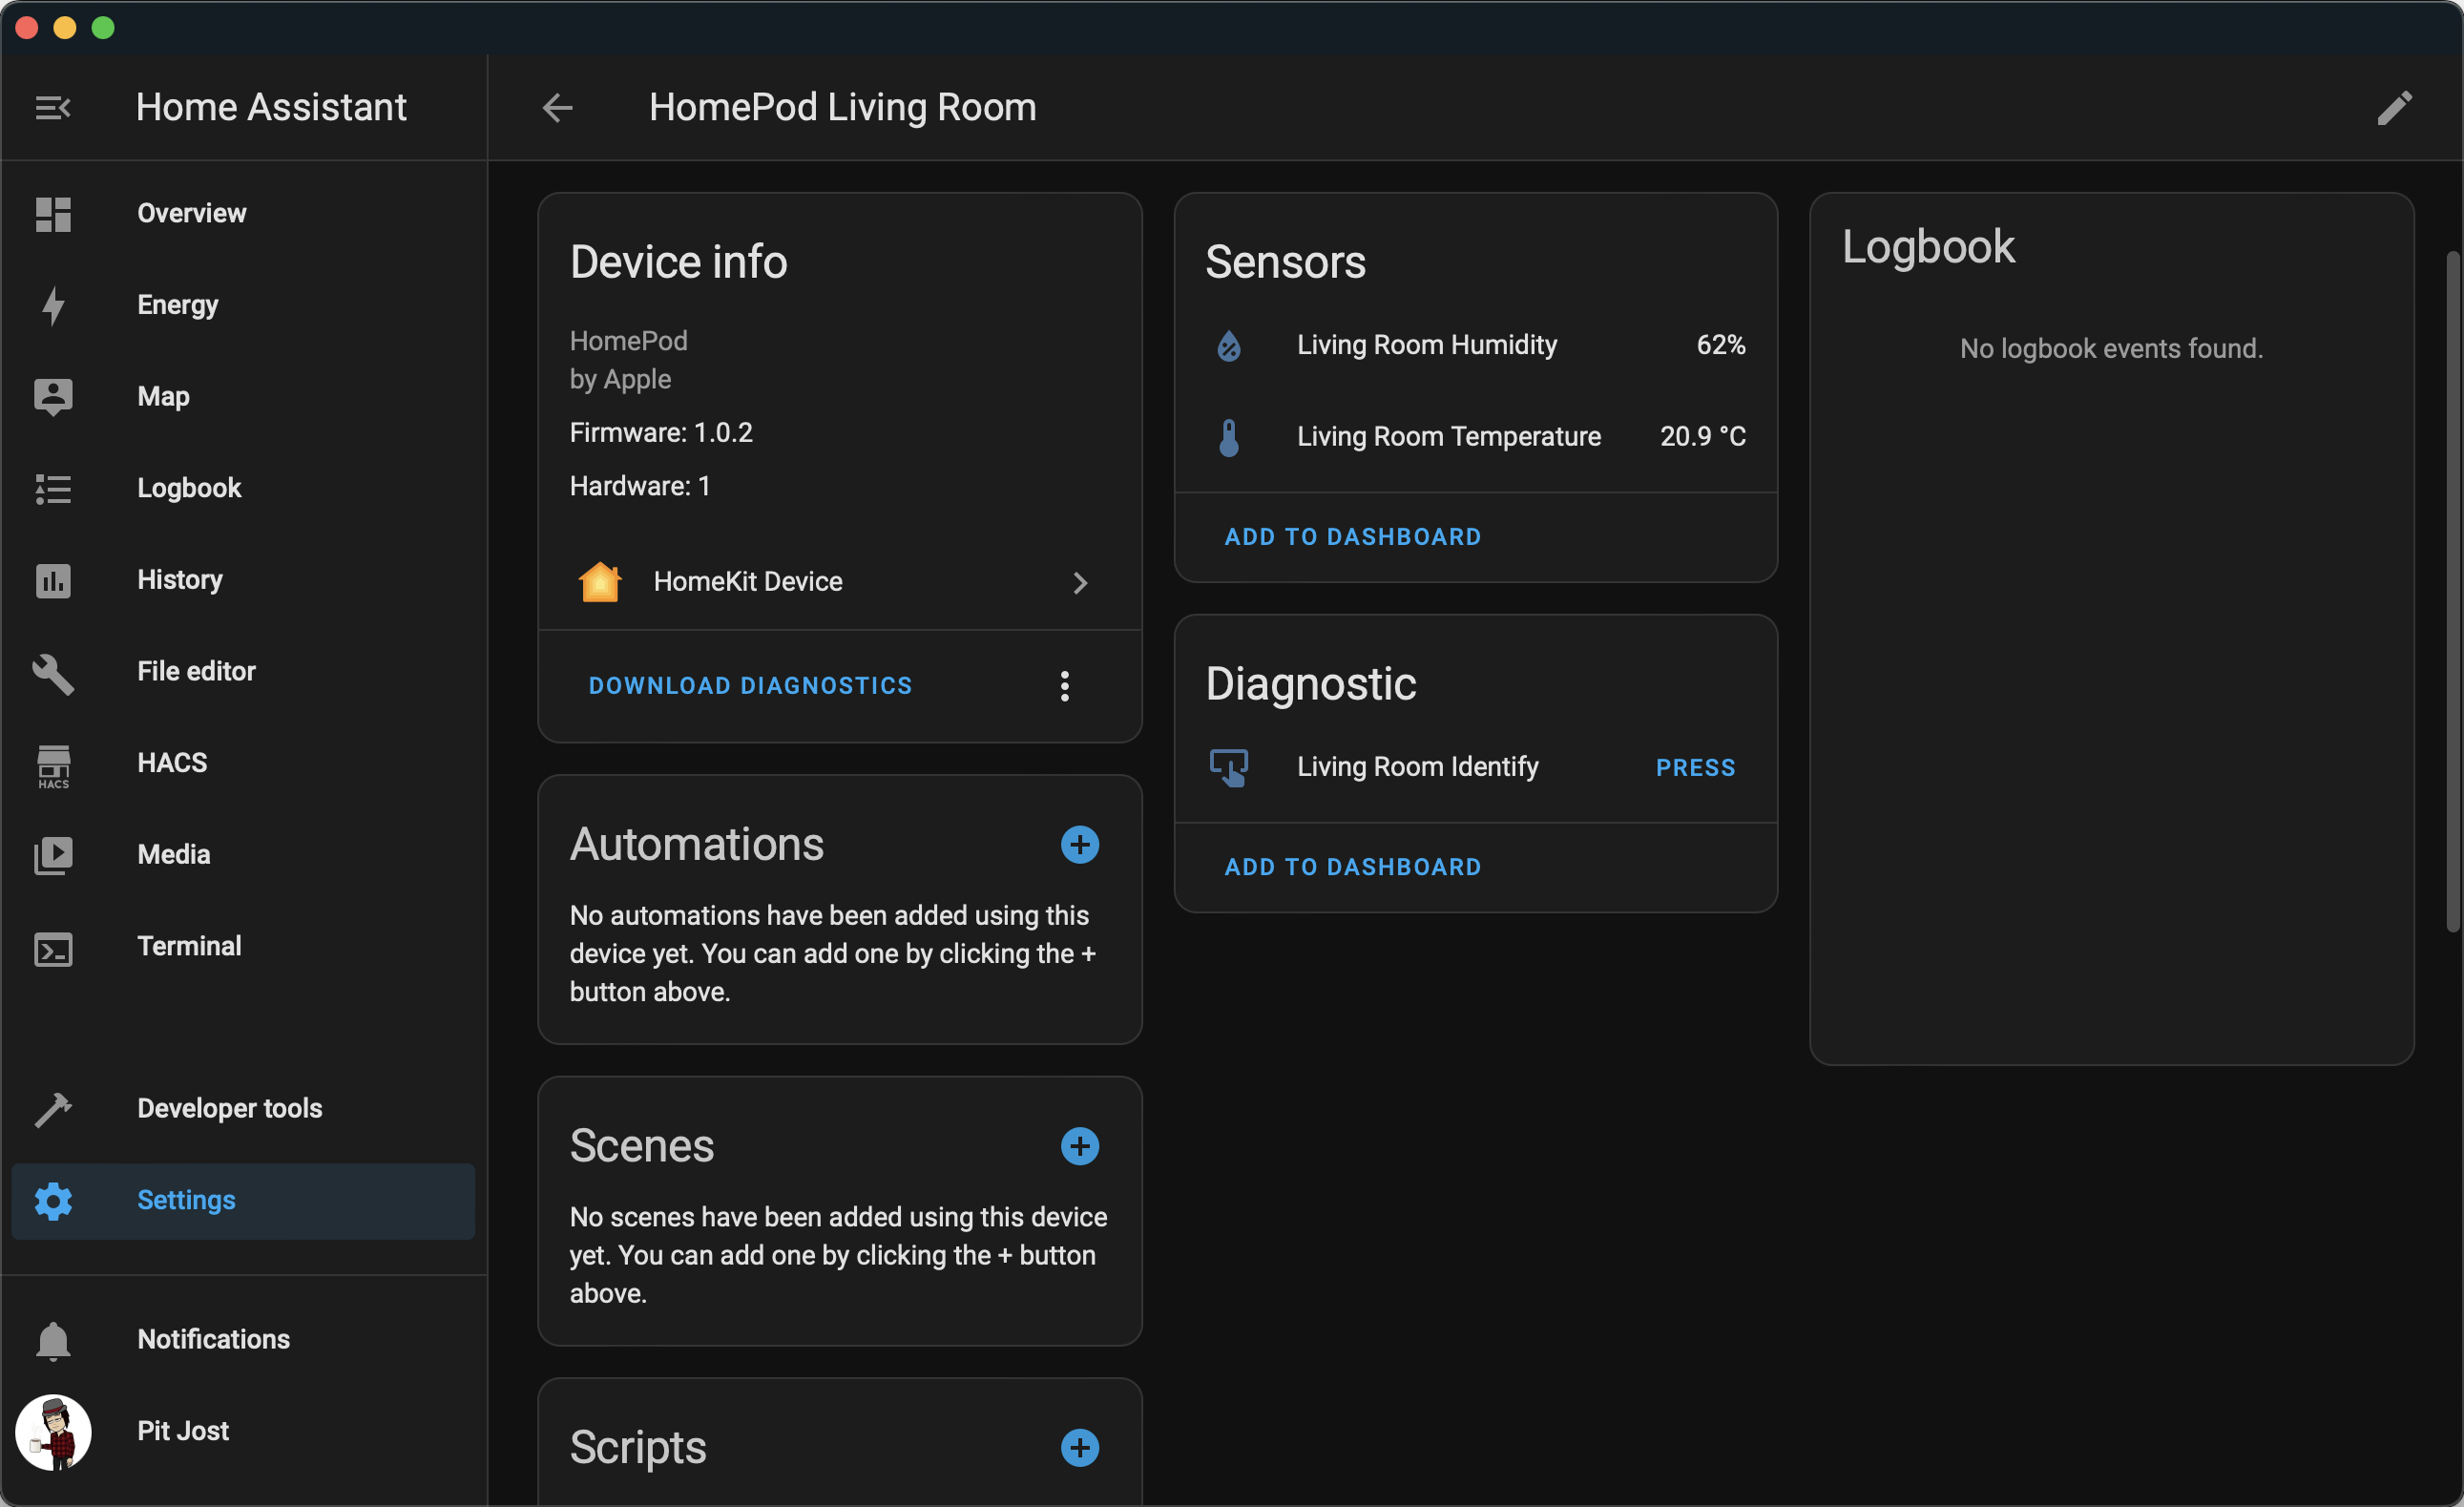
If you did everything right, you should now see your devices on the “Devices & services” page in the “HomeKit Device” category!